5 Plug-Ins to Supercharge Your End-to-End Cypress Tests
Nikhilesh Prasad


Unlock the full potential of Cypress and propel your end-to-end (E2E) tests to unprecedented heights.
I’ve worked with Cypress, a frontend testing tool for web applications, for five years. Along the way, I’ve uncovered several tools that have become indispensable in my end-to-end (E2E) testing arsenal and that have allowed the development team at Navan to deliver high-quality software with unwavering confidence.
In this article, I will not delve into the fundamentals of E2E Cypress testing, but instead, unveil several powerful plug-ins that integrate with Cypress and can elevate your E2E testing efforts to new heights.
These tools have been selected based on their ability to:
- Streamline testing workflows
- Enhance test organization and execution
- Generate realistic test scenarios
- Provide valuable insights into code coverage and visual regression
Here’s more about these tools, plus some secrets for unlocking the full potential of Cypress.
1. @cypress/grep
The @cypress/grep plug-in offers a reliable solution when dealing with multi-level tests, but without the need to create separate directories or complex test organization structures.
With this plug-in, you can streamline your test execution based on specific tags, eliminating the need for separate pipelines or directories for different test types.
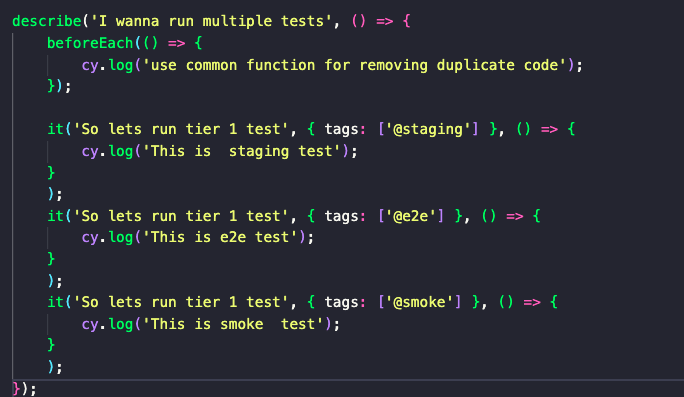
Imagine you have a suite of tests that cover various tiers or categories, such as staging, E2E, and smoke tests. Rather than duplicating code or maintaining separate test files, you can utilize the power of tagging to run specific subsets of tests with ease.
By specifying tags for each test, such as @staging, @e2e, or @smoke, you can use the plug-in to run the desired subset of tests selectively.
In the example below, a single test suite contains multiple tests with different tags:
This approach simplifies test execution, improves maintainability, and enables efficient debugging by focusing on specific tiers or categories of tests.
In your Cypress test runner or command line, you can use the following command to run tests with specific tags:
npx cypress run — env grepTags=”@staging”
This command instructs Cypress to execute only the tests tagged with @staging. Similarly, you can customize the command to target other tags, such as @e2e or @smoke. This flexibility allows you to effortlessly control the scope of your test runs without the need for complex test organization.
By leveraging the @cypress/grep plug-in with tagging, you can efficiently manage and execute multilevel tests within a single test suite, eliminating the need for separate directories so you can focus on specific test categories as needed.
Get started:
Install the @cypress/grep plug-in via npm by running the following command in your Cypress project:
npm install — save-dev @cypress/grep
More information and detailed instructions
2. cypress-terminal-report
The cypress-terminal-report plug-in has become an invaluable tool since I started using it a few months ago. It has significantly improved communication and collaboration with the release team and other development teams by providing detailed information and simplifying the test execution process.
Before using this plug-in, I often received questions from stakeholders such as, “Where is the response?” or “Can you provide more details?” The cypress-terminal-report plug-in helped address these concerns by enhancing the test reporting within the Cypress terminal itself.
In the example below, you will find examples of Cypress commands alongside their corresponding responses:
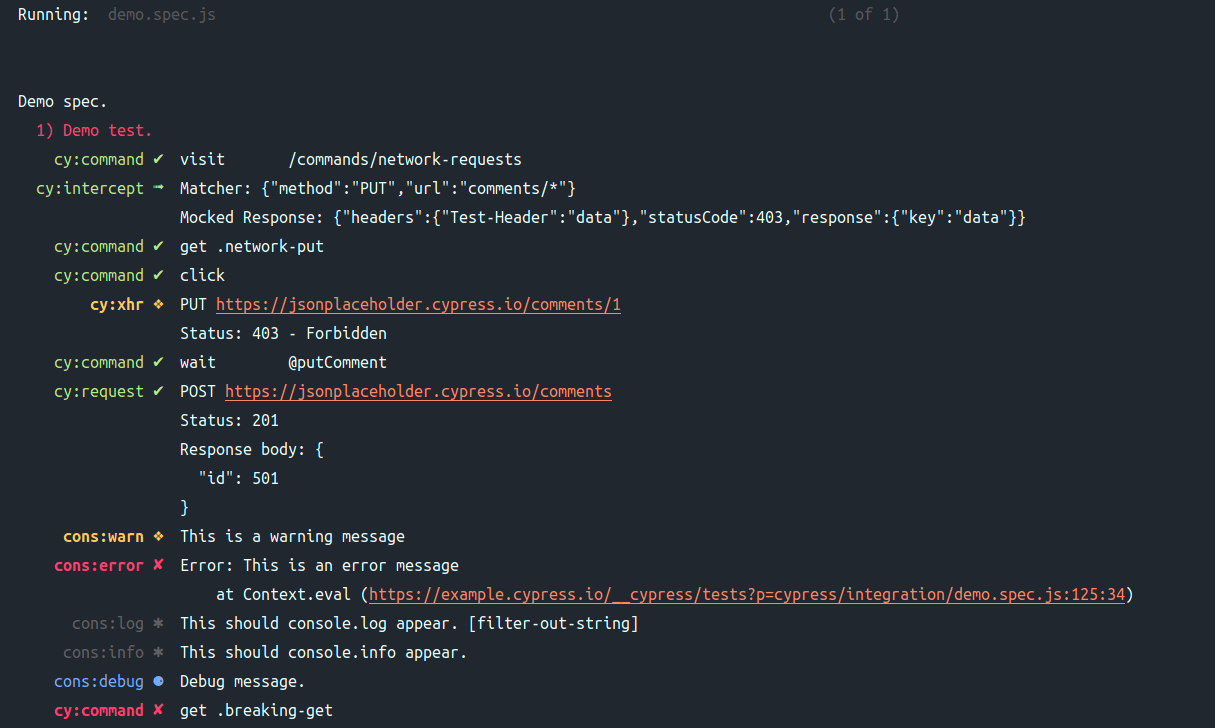
One of the key benefits of this plug-in is the ability to show the log in a simplified manner, especially when dealing with large response payloads. By trimming the response and focusing on the error message when a response fails, the plug-in enables clearer and more concise assertion messages in the test runner. This streamlined information helps me quickly identify and address issues without getting overwhelmed by unnecessary details.
Additionally, the cypress-terminal-report plug-in offers complete visibility of the response in the continuous integration (CI) environment. This means that during CI, the full response is displayed, allowing for thorough investigation and debugging when needed. This level of transparency ensures that any issues discovered in the CI pipeline can be effectively diagnosed and resolved.
By leveraging the cypress-terminal-report plug-in, I have experienced improved communication, faster issue resolution, and enhanced collaboration within my development team at Navan. The plug-in has streamlined the feedback process and provided a clearer understanding of test failures, making it easier to address issues promptly and efficiently.
Get started:
Install the cypress-terminal-report plug-in via npm by running the following command in your Cypress project:
install — save-dev cypress-terminal-report
More information and detailed instructions
3. pdf-parse
Validating PDF files can be a challenging task, especially when it comes to extracting specific information or verifying the content within the PDF. In the past, I faced difficulties in finding an efficient way to validate PDFs until I discovered the pdf-parse plug-in, which has been a game-changer for me.
The pdf-parse plug-in has made it much easier to parse and assert PDF files in my Cypress tests. This plug-in simplifies the process of extracting data from PDFs and enables me to validate specific content within the PDF.
With the pdf-parse plug-in, I can now easily retrieve text from a PDF document and perform assertions on it. This capability has been incredibly valuable, especially when I need to validate the presence of certain keywords or check if specific information is correctly displayed in the PDF.
Get started:
Install the pdf-parse plug-in via npm by running the following command in your Cypress project:
npm install — save pdf-parse
More information and detailed instructions
4. prettier, ts-prune, and ESLint
Maintaining best practices and standards is crucial when collaborating with multiple teams. These three plug-ins help ensure code quality and consistency across the project.
prettier
- What is prettier? It’s a powerful code formatter that automatically enforces a consistent code style.
- Why should you use prettier? It saves time by eliminating manual formatting and helps teams maintain a unified code base.
Use the following command in your Cypress project to get started:
npm install — save-dev prettier
ts-prune
- What is ts-prune? It’s a handy TypeScript tool that removes unused code, reducing bundle size and improving performance
- Why should you use ts-prune? It helps to keep your codebase clean and optimized.
Use the following command in your Cypress project to get started:
npm install — save-dev ts-prune
ESLint
- What is ESLint? It’s a popular linter that identifies potential issues and enforces coding standards.
- Why should you use ESLint? It catches errors, improves code quality, and helps maintain a consistent code base.
Use the following command in your Cypress project to get started:
npm install — save-dev eslint
By leveraging these plug-ins, you can enforce best practices and ensure that all team members adhere to the same coding standards. This can help improve collaboration, catch errors early on, and keep the code base clean and efficient.
5. GitHub Action Workflow
GitHub Action workflow is the cherry-on-the-top plug-in that will make your testing workflow even more seamless. With just a few lines of .yml code, you ensure that code formatting, linting, and dead code detection are automatically handled.When a pull request is created or modified, this workflow triggers and performs the following steps:
- Checks out the code from the repository
- Installs the necessary dependencies
- Formats the code using the npm run format command
- Lints the code using the npm run lint command
- Identifies and removes dead code using the npm run find-deadcode command
- Commits the changes with the message “Apply code formatting” using the
stefanzweifel/git-auto-commit-actionGitHub Action
The Github Action Workflow acts as your dedicated assistant, ensuring that your code meets the desired standards and keeps your project consistent. It’s like having an extra pair of eyes that tirelessly monitors and enforces code quality, giving you peace of mind, saving time, and guaranteeing consistent code quality across your team.
Get started:
Use the following command in your Cypress project:

More information and detailed instructions
By integrating these powerhouse tools into our E2E Cypress testing regimen at Navan, we’ve taken our testing game to a whole new level. Now you, too, can say goodbye to complex test structures and hello to streamlined communication and turbocharged collaboration.
The outcome? Soaring team productivity and a steadfast stream of top-notch software, delivered with unwavering conviction.
This content is for informational purposes only. It doesn't necessarily reflect the views of Navan and should not be construed as legal, tax, benefits, financial, accounting, or other advice. If you need specific advice for your business, please consult with an expert, as rules and regulations change regularly.
More content you might like
Take Travel and Expense Further with Navan
Move faster, stay compliant, and save smarter.